Cutting Activity For Kindergarten: A Simple, Fun Lesson Plan
Introducing a cutting activity for kindergarten is one of the most effective ways to boost fine‑motor development while keeping little hands busy and excited. When children learn to use scissors correctly, they gain confidence, improve hand‑eye coordination, and prepare for later writing tasks. This article outlines a step‑by‑step lesson that is easy to set up, engages students with music, and follows the natural stages of scissor development.
Why Cutting Skills Matter in Early Childhood
Fine‑motor skills are the foundation for many classroom activities, from drawing to writing letters. Cutting helps children practice:
- Grip strength – holding the scissors with the thumb on top and the middle finger underneath.
- Hand‑eye coordination – following a line and adjusting pressure.
- Bilateral coordination – using both hands together in a synchronized motion.
- Spatial awareness – judging where to start and stop a cut.
These abilities translate directly to better pencil control and overall classroom readiness.
Preparing the Classroom for a Safe Cutting Session
Before the activity begins, gather the following supplies:
- Child‑size safety scissors (blunt tip).
- Colored construction paper, cardstock, and simple shapes.
- A large sheet of plain paper for practice lines.
- Wet wipes or a small trash bin for clean‑up.
Arrange desks in a circle or small groups so each child can see the teacher demonstration. Place a “Scissor Safety” poster at eye level, highlighting the rule “Thumbs up, fingers in, scissors open.”
Understanding the Stages of Scissor Development
Children typically progress through three observable stages:
- Stage 1 – Exploration: Kids hold scissors but may open and close them without cutting.
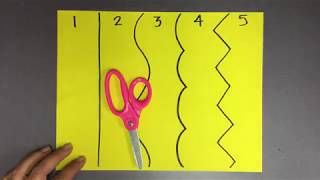
- Stage 2 – Guided Cutting: With adult help, they begin to cut straight lines.
- Stage 3 – Independent Cutting: They can follow curved lines and cut out simple shapes.
Plan activities that match the current stage of your class. For a mixed‑ability group, provide both straight‑line practice sheets and pre‑drawn shapes.
Step‑by‑Step Beginner Guide for Using Scissors
Use the following checklist each time you introduce a new cutting task:
- Thumb Position: Remind students that the thumb should face the top of the scissor handle.
- Finger Placement: The middle finger rests in the opposite hole while the index finger rests on the side for stability.
- Open‑Close Rhythm: